
2013 Best of Bloggers Gift Guide Giveaway
Hi guys, HOLY COW today I am sharing this amazing FLASH GIVEAWAY! Read all about it and have fun entering, good luck everyone!
.jpg)
.jpg)
Do you love creating things like me? Whether I am making a gift, creating something for my home, or coming up with something for myself I’ve always loved making stuff. I would *love* to find some crafting materials under my tree! Check out some of these amazing things any crafter would love to receive!

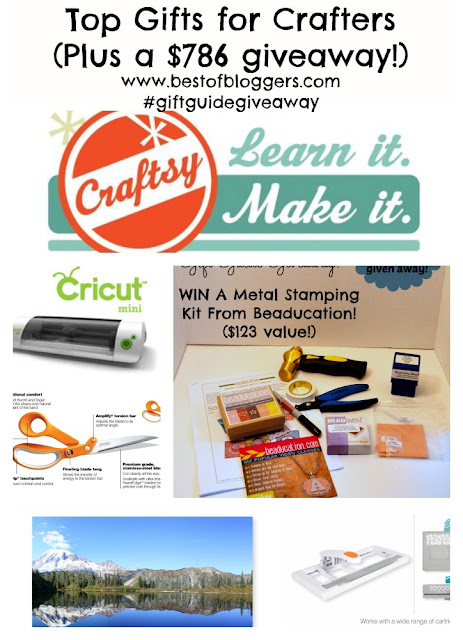
Beaducation
Beaducation is a one stop shopping spot for all things metal stamping! Metal stamping is really popular right now. You can make so many really amazing creations with metal stamping! One winner will win everything you need to get started! In fact you will win everything above!
To find out more about the products we will be giving away, inspiration for metal stamping creations and our full review on Beaducation products click here.
To shop Beaducation products click here.
Craftsy is the best place to learn new things! Get the Crafter on your list a class at Craftsy and they will forever thank you! Whether you are looking for classes on quiiting, sewing, paper crafting, cooking, baking, photography, knitting or more – Craftsy has the class for you! Find all of the classes offered here. They even have free mini classes so you can test it out! One winner will win 3 classes of their choice!
To read our full review of Craftsy click here.
To purchase a class from Craftsy click here.

Create My Walls
Create My Walls allows you to take some of your most prized photographs and turn them into works of art! Create My Walls allows you to turn your photographs into the traditional canvases but they have some other really cool options! The first is to get them turned into acrylic pieces of art. The glass finish high gloss finish adds crispness and clarity to your photos while adding depth. Your photo will become museum quality!
You can also get your photograph put on metal! The brushed effect enhances light and creates a beautiful matte finish. Both of these options look fantastic!
One winner will win one acrylic and one metal print! Both are good for 16×20 prints!
You can order your prints here.

Cricut
Cricut makes personal cutting machines that allow you to cut out just about anything you can imagine! The Cricut Mini is the perfect size making it easy to store. There are tons of images available to design tons of creative projects! One winner will win a Cricut Mini of their own!
You can learn more about the Cricut Mini and compare machines here.
You can purchase a Cricut Mini here.

Fiskars
Every crafter needs good scissors! Fiskars Amplify Media Shears are hands down the best! I have used them on the traditional craft supplies – fabric, paper (which, I know you should have separate scissors for paper, but I just wanted one little test!), yarn, even burlap! I’ve also used them in packing up some packages. These things cut through cardboard – no problem! Even thick styrofoam!! They were light and easy to use. I threw all of our other scissors away!

Fiskars also has a really cool AdvantEdge Punch System. It’s SOO easy to use and you can quickly cut out borders and strips for all kinds of paper crafts. Add a quick edge to scrapbooks, cards and anything else you can imagine. It’s small and compact which is great for storage. This is quickly becoming one of my favorite tools!
One winner will win: 2 pairs of Fiskars Amplify Scissors (6 and 8 inches)AdvantEdge Punch System Starter Set with Daisy Chain Punch Winter frost punch
You can read more about the products that are being given away and our full review here.
Don’t miss any of our other Best of Blogger’s Gift Guide Giveaways! We will be giving over $10,700 worth of prizes away! Click HERE to see the entire Gift Guide and enter for your chance to win!!Now, WHO WANTS TO WIN!?!?! One winner will win all of the items mentioned in our Top Gifts for Crafters! A $786 Retail Value! a Rafflecopter giveaway

This giveaway is hosted by Best of Bloggers
A big thanks to our Co-Host Pandora’s Deals!
We are cruising right along with our Gift Guide Giveaway. Today we are all about gifts for crafters! Remember, one winner will win all of the gifts in this post!!
That’s worth almost $800!!! Good luck!
you only have 24 hours to enter!
How fun! I would love to win any of those prizes!
How fun! I would love to win any of those things!
I like to make ornaments, sew and do some crocheting. Thanks for the fun give-away:@)
My favorite craft projects to make are personalized picture frames.
Ashley Ponder Richards
I love making crafts that I can use to decorate the home with 🙂
I just recently retired so I’m anxious to find out just what my favorite craft projects are.
OMG that would be crafters nirvana winning that lot!!
I love to sew!
My favorite projects are the ones that have something that sparkles 🙂
I love making banners for the different holidays. Also I am about to start scrapbooking my grandsons scrapbook… one for grandma, me, and one for mommy and daddy.
Making Christmas ornaments!
My favorite craft project is scrapbooking. Merdith245 at yahoo dot com
Love making gifts. The stamp set would be nice.
I quilt and scrapbook a little.